


MCX-8000
INPUTS & RECORDING
The Denon DJ MXC8000 offers a variety of Inputs and Operation modes. The unit can operate as a stand-alone mixer and playback audio from either an analogue media source (CD Player, Turntable etc) connected to one of the 4 available LINE Inputs at the rear panel or digital media from a USB device connected at the right-top panel via the integrated Engine application. Along with the ability to use a Computer DJ Application, the MCX8000 provides a variety of tools to the user.
MIXER CHANNELS
Channel 3 (far left) : Audio signal from an analogue source connected to the LINE 3 at the rear panel can be inserted and processed by the mixer when the switcher at the top panel is set to LN3 position
Audio signal from VirtualDJ Deck 3 can be routed to this Channel when the switcher at the top panel is set to PC position
Channel 1 (middle-left) : Audio signal from an analogue source connected to the LINE1 at the rear panel can be inserted and processed by the mixer when the switcher at the top panel is set to LN1 position
Audio signal from a digital source connected to the USB ports at the right-top panel can be inserted and processed by the mixer and the side decks via the integrated Engine application, when the switcher at the top panel is set to ENGINE position
Audio signal from VirtualDJ Deck 1 can be routed to this Channel when the switcher at the top panel is set to PC position
Channel 2 (middle-right) : Audio signal from an analogue source connected to the LINE2 at the rear panel can be inserted and processed by the mixer when the switcher at the top panel is set to LN2 position
Audio signal from a digital source connected to the USB ports at the right-top panel can be inserted and processed by the mixer and the side decks via the integrated Engine application, when the switcher at the top panel is set to ENGINE position
Audio signal from VirtualDJ Deck 2 can be routed to this Channel when the switcher at the top panel is set to PC position
Channel 4 (far right) : Audio signal from an analogue source connected to the LINE 4 at the rear panel can be inserted and processed by the mixer when the switcher at the top panel is set to LN4 position
Audio signal from VirtualDJ Deck 4 can be routed to this Channel when the switcher at the top panel is set to PC position
Notes :
- Each time a different source is selected from the top switchers, the audio signal of other sources on the same channel will be muted.
- Switch between various sources is smooth, providing the ability of back-to-back dj changeover. E.g. while VirtualDJ is used from one dj, the 2nd DJ can use Engine (USB stick) or an analogue media source (e.g. a Cd Players) to play a track until the first computer is disconnected from the USB and the 2nd one to be plugged.
Recording & Broadcasting
The unit offers the ability to record the Master Output along with the Microphone and LINE Inputs directly from VirtualDJ record button (in the MASTER center panel). The dedicated Recording input channel is already pre-configured, so no further adjustments need to be done.
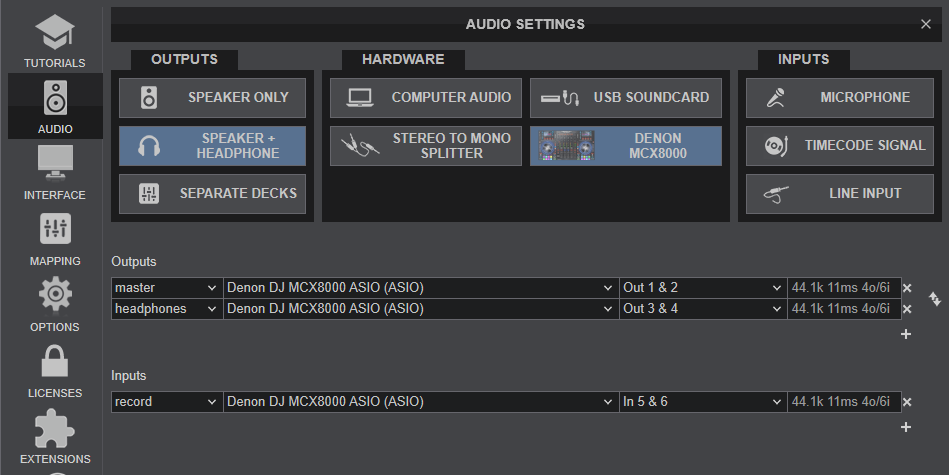
You will probably find the recording level quite low though, so you may want to increase the USB output level sent from the MCX8000, by visiting the UTILITIES of the unit.
Hold down the UTILITY/VIEW button, locate the USB Output Level setting and change it from the default 0db to around 10db.
Note : The recorded output includes any source routed to the Mixer, including media played via the Engine application or other analogue media sources connected to the LINE Inputs when the top switchers are set to the relative position.
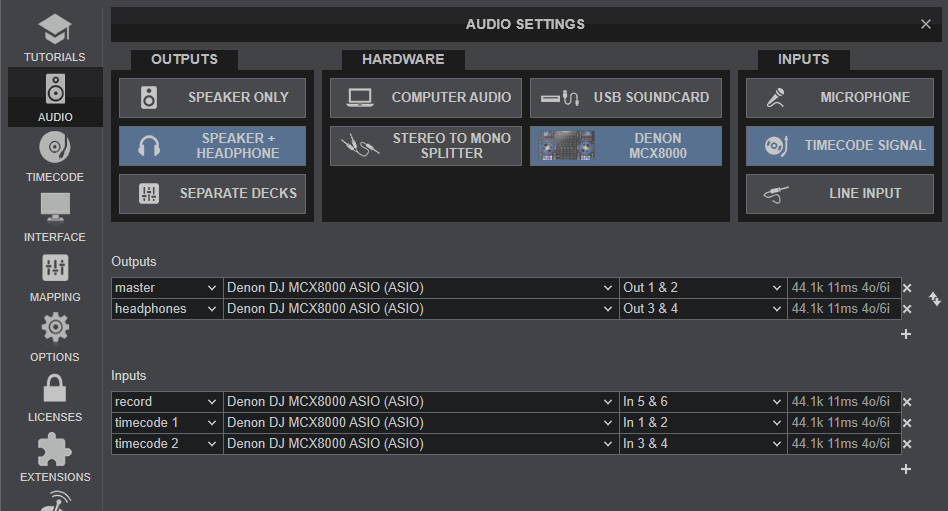
Timecodes (DVS)
The Denon DJ MCX8000 is offering DVS (Timecoded CDs and Vinyls) Support,
- Connect your Timecode devices to LINE 3 and/or LINE 4
- Place the PC/ENGINE/LN switches from the top panel to PC position for Mixer Channels 3 and/or 4
- Open VirtualDJ Settings ->AUDIO tab ans press the TIMECODE SIGNAL button from the INPUT tab
- Click to APPLY
Use the TIMECODE On/Off buttons that will be offered on the Decks (or in the SCRATCH panel for the 4 Decks default VirtualDJ GUI) to enable/disable Timecode control or use the Timecode signal to control a different Deck (e.g. swap Timecode control for Left decks when the 4 Decks GUI is selected)
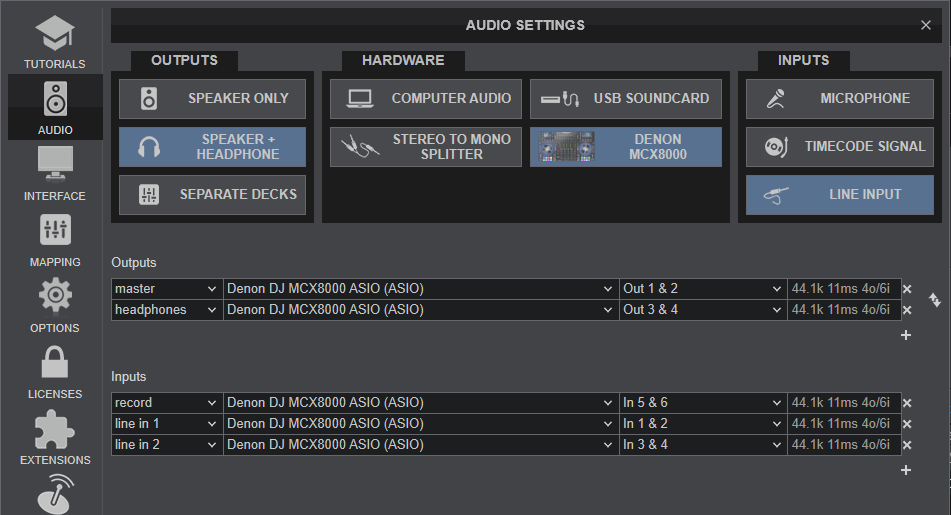
LINE INS
The same LINE Inputs 3 and 4 can be also used to send audio signal from an analogue media source connected at the rear panel to VirtualDJ for processing.
- Connect your analogue media devices to LINE 3 and/or LINE 4
- Place the PC/ENGINE/LN switches from the top panel to PC position for Mixer Channels 3 and/or 4
- Open VirtualDJ Settings ->AUDIO tab and press the LINE INPUT button from the INPUT tab
- Click to APPLY
Use the LINE IN On/Off buttons that will be offered on the Decks (or in the SCRATCH panel for the 4 Decks default VirtualDJ GUI) to enable/disable Line In routing to a VirtualDJ deck.
This will provide the ability to synchronize BPM with other decks, use Effects etc.
MICROPHONE INPUTS
The Denon DJ MCX8000 offers 2 Microphone Inputs and Level/EQ/Echo controls from the top panel. Both audio signals from these inputs are directly routed to the Master Output of the unit.
The Microphone inputs are not part of the USB Audio interface, so these cannot be added in VirtualDJ Audio setup and will not control the software Microphone section in the MASTER panel of VirtualDJ GUI and vice versa.
However, as mentioned in the Recording section, both Microphone Inputs can be recorded via the REC button of VirtualDJ via the dedicated recording input channel of the Audio interface.
