


MCX-8000
触垫
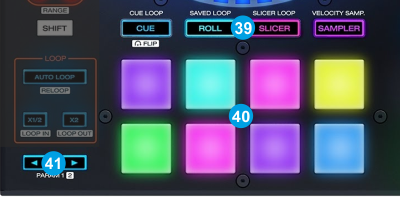
Pads (40) offer 10 different modes, depending on the PAD MODE SEL buttons (39). Press the same PAD MODE button again to access the additional mode (the LED will get a different color). Hold SHIFT and then press the CUE or SAMPLER mode buttons to get 2 additional modes.
Each time a mode is selected, a Page will be selected and displayed on the Pads section of the default VirtualDJ skin
Note: The ROLL and SLICER pad modes don't offer any additional mode if SHIFT is pressed.
Use the PARAMETER < > buttons (41) to adjust the Parameter 1 (if available) of the selected Pads page
Hold SHIFT down and then use the PARAMETER < > buttons (41) to adjust the Parameter 2 (if available) of the selected Pads page
HotCues mode
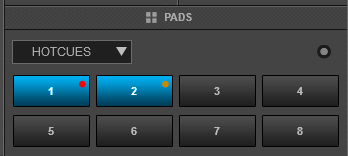
Press the CUES mode button to set the PADs to HotCue mode (LED will be lit blue). The Hotues page will be then selected and displayed on the Pads section of the VirtualDJ skin
Each one of the 8 pads assigns a Hot Cue Point (1 to 8) or returns the track to that Hot Cue Point.
When a Hot Cue Button is unlit, you can assign a Hot Cue Point by pressing it at the desired point in your track. Once it is assigned, the Hot Cue Button will light up.
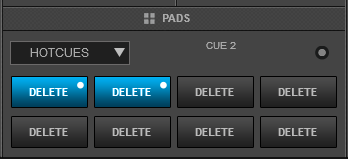
Hold SHIFT and then press any of the pads to delete its assigned Hot Cue Point.
Use the PARAMETER < and > buttons (41) to jump to the next or previous HotCue.
Hold SHIFT down and then use the PARAMETER <> buttons to jump the track forward/backwards by 1 beat
Note: By default Hotcues will get the color of the deck (blue for deck 1, red for deck 2, green for deck 3 and orange for deck 4). A different coloring behavior can be offered via the NonColoredPOI setting (from VirtualDJ Settings OPTIONS tab).
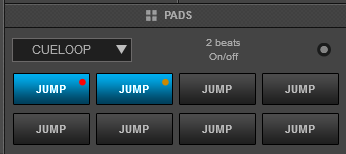
Cue-Loop mode
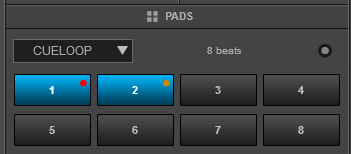
Press the CUES Mode button twice (or once if the selected mode was HotCues) to set the Pads to HotCue Loop mode (the led of the CUES button will be lit green). The CueLoop page will be then displayed on the Pads section of VirtualDJ skin
Each one of the 8 Pads assigns a Hot Cue Point or returns the track to that Hot Cue Point, but in both cases, it also triggers a momentary or toggle Loop depending on the selected mode.
The currently selected length will be used for the triggered Loop
Hold SHIFT down and then press a pad to jump to the Hot Cue Point but leave the Loop enabled.
Use the PARAMETER < and > buttons (41) to half and double the size of the applied Loop.
Hold SHIFT down and then use the PARAMETER < > buttons to select the On/Off (toggle) or Hold (loop will be enabled while the Pad is pressed) mode
Loop Roll mode
Press the ROLL mode button to set the Pads to Loop Roll mode (LED will be lit cyan). The LOOP ROLL page will be then selected and displayed in the Pads section of the default VirtualDJ skins.

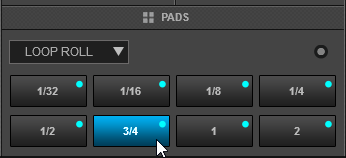
Each one of the 8 Pad triggers a momentary Loop Roll (while pressed) of a different length in beats as per the images above.
In this mode the PARAMETER (41) buttons have no functionality.
Saved Loops mode
Press the ROLL Mode button twice (or once if the selected mode was Loop Roll) to set the Pads to Saved Loops mode (the led of the ROLL button will be lit yellow). The Saved Loops page will be then selected and displayed in the Pads section of the VirtualDJ skins.
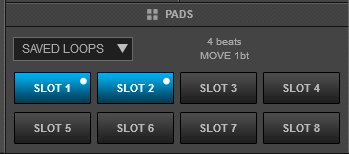
This mode offers the ability to save up to 8 Loops to individual Loop Slots.
Press any Pad to save the current Loop at the current track’s position (of the selected size in beats) to the relative slot. Hold the same Pad down for more than 1 second to delete the Saved Loop.
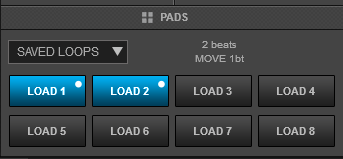
When a Loop slot is saved, press the corresponding Pad to load (prepare) the Saved Loop.
If the track’s position is before the Saved Loop point, the loop will be enabled but the track will not jump to that position (Prepare status). Use the same Pad to disable the Loop.
Hold SHIFT down and then press one of the lower Pads to load the Saved Loop, but also jump to that position.
Use the PARAMETER < and > (41) buttons to half and double the size of the triggered Loop.
Hold SHIFT down and then use the PARAMETER buttons to move the Loop forward/backwards by 1 beat
Slicer mode
Press the SLICER mode button to set the PADs to Slicer mode (LED will be lit red).The Slicer Page will be then selected and displayed in the Pads section of VirtualDJ skin.
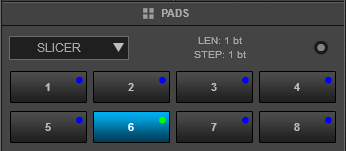
The eight pads represent eight sequential beats/Slices in the Beat Grid. The playing Slice is represented by the currently green lit pad. The green light will "move through the pads" as it progresses through each eight-Slice phrase. Press a pad to repeat that Slice (hold it down if you want to keep looping it). Once the Pad is released the track will continue to play from the position it would have been if the pad was never pressed.
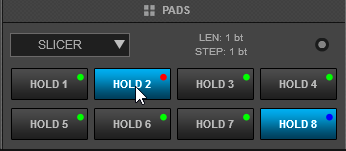
Hold SHIFT button down and then use the same Pads to use the Slicer in Hold mode. In this mode, the slices are memorized (using the last triggered ones)
Use the PARAMETER < and > buttons (41) to adjust the length of the Loop applied to the slice. Press SHIFT and then use the same PARAMETERS < and > buttons to adjust the step of the Slices.
Beatjump mode
While the Slicer mode is selected, press the same SLICER mode button again to set the PADs to Beat Jump mode (led will blink). The BeatJump page will be then selected and displayed on the Pads section of the VirtualDJ skin
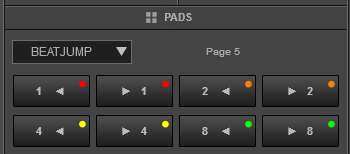
In this mode, each one of the Pads will jump the track backwards/forward by the amount of beats depending on the selected page/bank (from 1/8 beats to 32 bars)
Use the PARAMETER < > buttons to select a different bank/page with the desired size of beat jumps
Sampler mode
Press the SAMPLER mode button to set the PADs to Sampler mode (LED will be lit magenta). The Sampler Page will be then selected and displayed in the Pads section of the VirtualDJ default skins
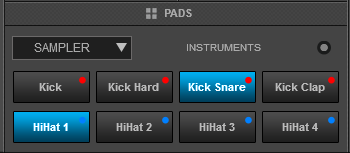
Each one of the 8 pads triggers a sample (1 to 8) from the selected Sampler Bank of VirtualDJ. If the selected Sampler Bank has less than 9 samples, both sides of the unit will trigger the same Samples. If the selected Sampler Bank has more than 8 samples, the left side of the unit will trigger Samples 1 to 8 and the right side of the unit will trigger Samples 9 too 16.
The leds of the Pads will automatically get the assigned color of each sample (dark when off, bright when playing).
Press the pads to trigger a sample. Depending on the selected trigger mode, use SHIFT and the same pads to stop the sample.
Use the PARAMETER < and > buttons (41) to select the previous and next Sampler Bank.
Hold SHIFT down and then use the same PARAMETERS buttons to select the previous/next Trigger Pad mode (on/off, hold, stutter, and unmute)
Sampler Velocity mode
While the Sampler mode is selected, press and hold down the same SAMPLER mode button for more than 1 second to to enable/disable Sampler Velocity mode (led will be lit purple).
When enabled, each one of the 8 pads triggers a sample (1 to 8) from the selected Sampler Bank of VirtualDJ, with the difference that the Output Volume of each sample is determined by the strength the Pad was initially pressed.
Tip: To return all samples to their maximum values after the Velocity mode is used, select the next or previous available bank and then select the current again.
Remix Points mode
Hold SHIFT down and then press the CUES mode button to set the PADs to Remix Points mode (led will be lit red). The Remix Points Page will be then selected and displayed in the Pads section of the VirtualDJ default skins
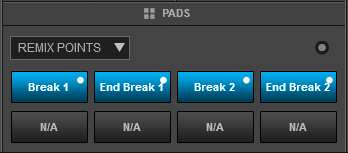
This mode offers the first 8 Remix Points of the loaded track. Remix Points are automatically defined from VirtualDJ, once the track is analyzed. Remix points can be managed from the POI Editor (more can be added/adjusted/deleted). They usually represent End/Start points of track’s blocks depending on the structure of the track and are always quantized when triggered.
The Remix points will be visible on the Song-position progress of the GUI (with white markers) once the Remix Points Pad page is selected.
Key - HotCue mode
Hold SHIFT down and then press the SAMPLER mode button to set the PADs to Key - Hotcue mode (led will be lit green). The KeyCue Page will be then selected and displayed in the Pads section of the VirtualDJ default skins
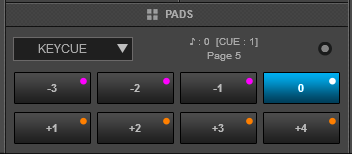
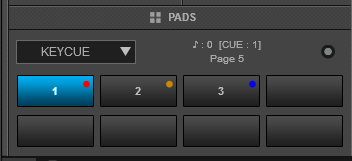
In this mode, the Pads trigger a selected Hotcue point (or the Temporary Cue if none selected or not available) at a selected Key semitone (from -7 to +7).
8 different pages/banks are offered with various semitone values to use and a 0 value (reset key to tis original value) is always offered in all pages.
Hold SHIFT and then select a Hotcue for the Key pads to trigger. Each time a Pad is pressed, the track will jump to that Hotcue point and will also alter the Key of the track to the value designated by it assigned value.
Use PARAMETER buttons <> to adjust the Key of the track without trigger a Hotcue.
Hold SHIFT and then use the PARAMETER buttons to select a different page/bank with different key semitone values.
MCX8000 Browser mode
A special MCX8000 page is also available when the MCX8000 is connected. The page can be selected from the drop-down list of the GUI.
This special page will provide the ability to adjust the content of the Browser columns on the LCD screens. The selections are saved across sessions and only apply to the Browser view of the MCX8000 Displays and not the Browser of VirtualDJ.
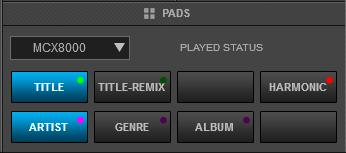
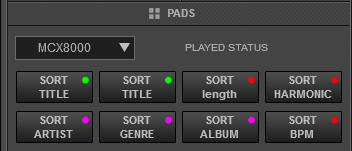
Use Pads 1 or 2 (green pads) to display Title or Title (Remix) at the 1st column of the Files Browser view on the LCD screens of the unit
Use Pads 5, 6 or 7 (purple pads) to display Artist, Genre or Album for the 2nd Column of the Files Browser view
Use Pad 4 (red pad) to display Harmonic, Key or Key Difference for the 3rd Column of the Files Browser view when the Key column is selected (via SHIFT+VIEW button)
Hold SHIFT down and then use the Pads to sort Columns 1, 2 and 3 alphabetically in ascending or descending order, depending on the selected field of each Column.
Use PARAMETER buttons <> to choose between displaying the Tracks with the assigned colors, or displaying Played tracks in red and un-played tracks in white.
Notes :
- The MCX8000 can be only selected from the Pads Page drop-down list of the GUI, but you may also assign any button as pad_page 'MCX8000' to perform this action
- The actions assigned to the Pads of this page, can be controlled from both the GUI and the MCX8000 Pads.