PLAY: Play/Pauses the track. Hold SHIFT and then press this button to apply a Brake effect on pause or play
CUE: When the Deck is paused, you can set a temporary Cue Point by moving the Platter to place the Audio Pointer at the desired location and then pressing the Cue Button. During playback, you can press the Cue Button to return the track to this Cue Point. (If you did not set a Cue Point, then it will return to the beginning of the track.). If the Deck is paused, you can press and hold the Cue Button to play the track from the Temporary Cue Point. Releasing the Cue Button will return the track to the temporary Cue Point and pause it. To continue playback without returning to the Temporary Cue Point, press and hold the Cue Button, then press and hold the Play Button, and then release both buttons. Hold SHIFT and then press this button to return to the beginning of the track
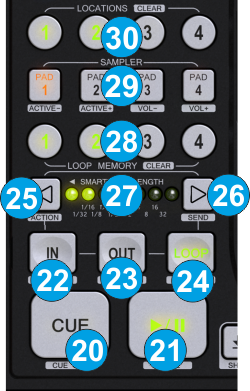
LOOP IN. When track is not in Loop, use this button to set current track's position as the start point of a manual loop. When in Loop, use this button to set the Jogwheel to Loop In Adjust mode (LED will blink) and then use the jogwheel to fine-adjust this position. Hold SHIFT down and then use this button to move the Loop backwards in time by 1 beat.
LOOP OUT. When track is not in Loop, use this button to set current track's position as the end point of a manual loop and enable the Loop. When in Loop, use this button to set the Jogwheel to Loop Out Adjust mode (LED will blink) and then use the jogwheel to fine-adjust this position. Hold SHIFT down and then use this button to move the Loop forward in time by 1 beat.
LOOP. When track is not in Loop, use this button to enable an Auto-Loop of the selected size in beats When in Loop, use this button to exit the Loop. Hold SHIFT down and then use this button to enable/disable Smart Loop. When enabled, manual loops created with the In/Out Loop buttons will snap to the nearest size in beats, creating a seamless loop.
LOOP HALF. Use this button to half the size of the Loop in beats. Hold SHIFT down and then use this button to cycle through the 3 available view modes for the Loop Led Bar (Loop size, VU meter and Song Progress)
LOOP DOUBLE. Use this button to double the size of the Loop in beats. Hold SHIFT down and then use this button to enable/disable Loop Roll mode. When enabled, after a Loop is disabled, the track will continue playback from the position it would have been if the Loop was never triggered.
LOOP LED BAR. The 7 Leds of the Loop Bar offer 3 different views (selected by SHIFT+LOOP HALF) . In Loop size mode (default) the Leds of the Loop Bar will designate the size of the Loop, as per the silkscreen of the unit. In VU meter mode, the Leds designate the output pre-fader volume of each deck. In Song Progress mode, the Leds designate the part of the track that has been played already and will blink when track reaches 30 seconds before its end.
LOOP MEMORY BUTTONS 1-4. Use these buttons to save, recall and delete up to 4 Saved Loops.Press a button to save the current loop to slots 1 to 4. Press the same button to recall (enable the Loop but not jump to its position if later to the current one. Hold the same button for more than 1 second to delete the Loop from the slot. Hold SHIFT down and then use these buttons to enable the saved Loop but also jump to its position.
SAMPLER BUTTONS 1-4. Use these buttons to trigger Samples 1 to 8 from the selected Sampler Bank. If the selected Sampler Bank has less than 5 samples, both sides of the unit will trigger the same samples 1 to 4. If the selected Sampler Bank has more than 4 samples, the left side Sampler buttons will trigger Samples 1 to 4 and the right-side Sampler buttons will trigger Samples 5 to 8. The Sampler Bank selection is done from the VirtualDJ GUI (Sampler view of Sideview) Hold SHIFT down and then use these buttons to stop the playing Sample. Useful when the Un-mute or Stutter Sampler trigger mode is selected.
LOCATION BUTTONS. Use these buttons to save, recall and delete Hotcues 1 to 4. When a Hotcue is not assigned, use a button to save current track's position to Hotcue 1 to 4. Use the same button to recall and jump the track to that position. Hold SHIFT down and then use the same button to delete its assigned Hotcue.