Stanton - DJC-4 - Layout
ADVANCED DECK CONTROLS
Effects
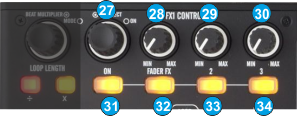
The FX CONTROL section offers control of 3 different Effect Slots. The Slot selection is made by pushing the FX SELECT (27) encoder and the Leds of the FXON (31), FX2ON (33) and FX3ON (34) buttons will indicate which Effect Slot is selected
- FX SELECT. Use this encoder to select the Effect of FX Slot 1, 2 or 3. Push the encoder to select which FX Slot of VirtualDJ you wish the whole FX Section to control.
Hold SHIFT down and then push the encoder to show/hide the FX GUI of the selected Effect.
- FX 1 knob. Use this knob to control the 1st parameter of the selected Effect. If FADERFX (32) is enabled the knob will not have any function
- FX 2 knob. Use this knob to control the 2nd parameter of the selected Effect. If FADERFX (32) is enabled the knob will not have any function
- FX 3 knob. Use this knob to control the 3rd parameter of the selected Effect
- FXON button. Press this button to trigger the selected Effect of FX Slot 1. The Led of this button will blink if the effect is enabled and will be lit if the 1st Slot is selected to be handled by the top knobs
- FADERFX. Press this button to enable/disable the FADERFX mode. If the FADERFX mode is enabled (led will blink), the 1st and 2nd parameters of the selected Effect will be controlled by the Volume Faders (4).
- FX2ON button. Press this button to trigger the selected Effect of FX Slot 2. The Led of this button will blink if the effect is enabled and will be lit if the 2nd Slot is selected to be handled by the top knobs
- FX3ON button. Press this button to trigger the selected Effect of FX Slot 3. The Led of this button will blink if the effect is enabled and will be lit if the 3rd Slot is selected to be handled by the top knobs
Loops
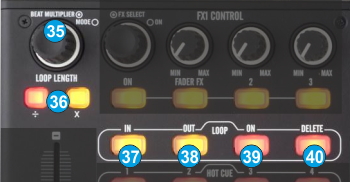
- LOOP ENC. Use this encoder to half/double the size of the loop. Push the encoder to trigger a loop of the selected size (in beats).
Hold SHIFT down and then use the encoder to move the loop forward or backwards by 10% of its size.
Hold SHIFT down and then push the encoder to toggle between the Normal and Loop Roll mode.
When Loop Roll mode is enabled, the triggered loops will apply temporary, and the track will return to the position it would have been if the loop was never triggered.
- LOOP LENGTH -/+. Press these buttons to half/double the size (in beats) of the Loop.
- LOOP IN. Press this button to set a Loop In (Entry point). When a loop is enabled, hold SHIFT down and then press this button to set the Jogwheel to Loop In mode and (fine) adjust the Loop In point using the jog. The Led of the button will blink to indicate the Loop In Wheel mode. Press again to return the Jogwheel to Jog mode.
- LOOP OUT. Press this button to set a Loop Out (Exit point). When a loop is enabled, hold SHIFT down and then press this button to set the Jogwheel to Loop Out mode and (fine) adjust the Loop Out point using the jog. The Led of the button will blink to indicate the Loop Out Wheel mode. Press again to return the Jogwheel to Jog mode.
- LOOP ON. Press this button to trigger a Loop of the selected size or exit the loop if triggered. When a loop is enabled, hold SHIFT down and then press this button to set the Jogwheel to Loop Move mode and (fine) move the Loop backwards or forward using the jog. The Led of the button will blink to indicate the Loop Move Wheel mode. Press again to return the Jogwheel to Jog mode.
- LOOP DELETE. Press this button to exit the loop. Hold SHIFT down and then use this button to trigger the last triggered loop (reloop)
Hotcues & Samples
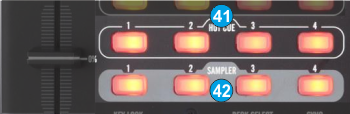
- HOTCUE (1-4). Use these 4 buttons to assign a Hot Cue Point (1 to 4) or return the track to that Hot Cue Point. When a Hot Cue Button is unlit, you can assign a Hot Cue Point by pressing it at the desired point in your track.
Once it is assigned, the Hot Cue Button will light. To return to that Hot Cue Point, simply press it.
Press and hold SHIFT and then press a Hot Cue Button to delete its assigned Hot Cue Point.
- SAMPLE (1-4). Use these 4 buttons to trigger a Sample from the selected Bank of VirtualDJ. If the selected bank has less than 5 samples (slots), both sides of the Stanton DJC.4 will control the same samples. If a bank has more than 4 samples (slots), the left side of the Stanton DJC.4 will control samples 1 to 4 and the right side samples 5 to 8.
Hold SHIFT down and then press a button to stop the corresponding sample (useful if the selected Sampler Trigger mode is set to Stutter or Unmute)


