MASTER OUT (Balanced - XLR): Connect this low-impedance XLR output to a PA system or powered monitors. The level of this output is controlled with the Master Level knob on the top panel.
MASTER OUT 2 (Unbalanced - RCA): Use standard RCA cables to connect this output to a speaker or amplifier system. The level of this output is controlled by the Master Level knob on the top panel.
BOOTH OUT (XLR): Use TRS cables to connect this output to a booth monitoring system. The level of this output is controlled by the Booth Level knob on the top panel.
AUX INPUT. Connect an auxiliary audio source to this input using standard RCA cable. The level of this input is controlled by the AUX level knob at the front panel. This input is not part of the USB Audio interface and its signal will be routed directly to the Master Output.
MIC 1/2 Connect a microphone to these socket, using a 1/4" cable or XLR. The audio signals of these input is routed directly to the Program Mix and Cue Mix. The level of the Microphone Inputs is controlled from the top-right panel These inputs are not part of the USB Audio interface and their signal will be routed directly to the Master Output.
USB B. Use the provided USB type B to type A cable to connect the unit with a USB port of a computer. This USB connection sends and receives audio and control information from a connected computer.
USB MEDIA. Connect USB media devices in this USB port.
LINK.Not used in VirtualDJ
POWER IN & ON/OFF: Use the included AC/DC power adapter to connect Prime GO to a power outlet. While the power is switched off, plug the cable into unit first, and then plug the cable into a power outlet. Use the Power Switch to turn the unit on and off. Turn on unit after all input devices have been connected and before you turn on amplifiers. Turn off amplifiers before you turn off unit
Denon DJ Prime GO - Front panel
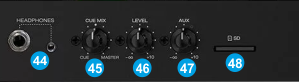
HEADPHONES SOCKET. Connect your 1/4" or 1/8" headphones to this output for cueing and mix monitoring.
CUE MIX Use this knob to blend Master Output signal with the Channels that have the CUE/PFL buttons enabled. When the knob is at the minimum position, only audio coming from the channels that have CUE/PFL enabled will be sent to Headphones. When in maximum position only audio signal from Master Output will be sent to the Headphones channel. Independent Hardware operation, not controlling VirtualDJ Headphones Mix knob but its movement is visible on VirtualDJ GUI
CUE LEVEL Adjust the Volume of the Headphones Channel.
AUX LEVEL. Adjusts the output volume of the AUX input (connection at the rear panel).