Pioneer DJ - DJM-S5 - Layout
FRONT & REAR PANELS
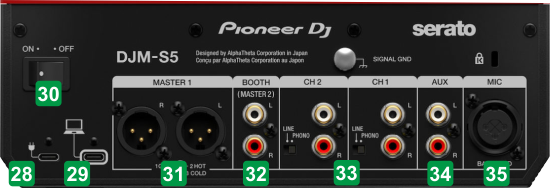 Pioneer DJM-S5 - Rear panel
 CONNECTION
Operation
28 * USB POWERUse this USB-C connection to power the device using a proper USB power device,29 * PC USB POWERUse this USB-C connection to connect to a USB port of a computer.30POWERPower on when all other connections are done31 MASTER OUTBalanced Master Output using XLR cables to connect with your amplifier/amplified speakers32 BOOTH OUTBooth Output using RCA cables to connect with your monitor speakers33 CH1/CH2 INPUTSUse these sockets to connect an external audio source. Depending on the type of the source, set the PHONO/LINE switch to the appropriate position. The sources connected to these Inputs can be selected from the Left (for CH1)/Right (for CH2) Source Selector at the top panel34 AUX INPUTConnect any Digital Media source to this additional input. Signal from this Input will directly routed to the Master Output. The level of this audio signal is controlled from the AUX LEVEL knob at the front panel of the unit35 MIC INPUTConnect a Microphone using a XLR or 1/4" TRS cable. The level of this audio signal is controlled from the MIC LEVEL knob at the front panel of the unit* Use one or the other USB power connections.
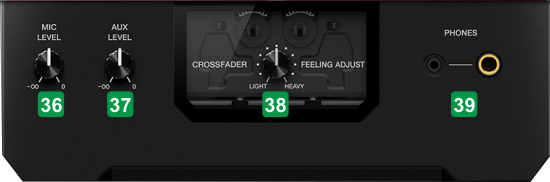 Pioneer DJM-S5 - Front panel
 CONTROL
Operation
36 MIC LEVELAdjust the Level of the Microphone Input (connection at the rear panel).37 AUX LEVELAdjust the Level of the Auxiliary Input (connection at the rear panel) 38 CROSSFADER FEELING ADJUSTAdjust the feeling of the Crossfader (how much strength is required to slide) 39 HEADPHONES SOCKETConnect your Headphones using a 1/8" or a 1/4" adapter. The level of this output is controlled from the top panel


