XDJ-RX
触垫
The 4 Pads offer various functions, depending on the selected Pad mode. Each of the 3 Pad Mode buttons offers 2 individual modes (hold SHIFT and then press the PAD MODE button to access the additional mode).
The modes represent a page of the PADS section on the default VirtualDJ GUI.
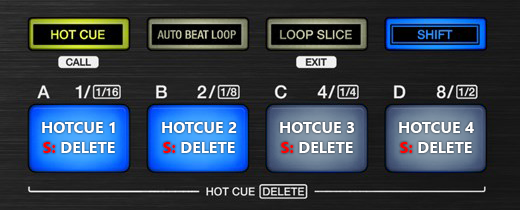
HotCues Mode
Each one of the 4 pad assigns a Hot Cue Point (1 to 4) or returns the track to that Hot Cue Point. When a Hot Cue Button is unlit, you can assign a Hot Cue Point by pressing it at the desired point in your track.
Hold SHIFT and then press a pad to delete its assigned Hot Cue Point.
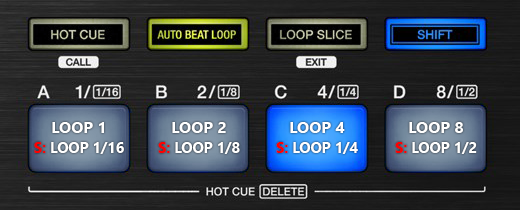
Auto Loop Mode
Each one of the 4 pad triggers a seamless Loop of a different size (in beats).
Hold SHIFT and then press the same Pads to trigger a different loop size (see image)
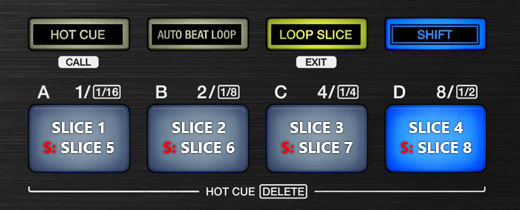
Slicer Mode
The 8 pads (4 in normal operation and 4 while SHIFT button is held down) represent eight sequential beats—"Slices"— in the Beat Grid. The currently playing Slice is represented by the currently lit pad. The light will move through the pads as it progresses through each eight-slice phrase. Press a pad to repeat that Slice (hold it down if you want to keep looping it).
Once the Pad is released the track will continue to play from the position it would have been if the pad was never pressed.
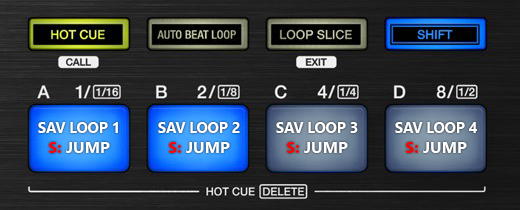
Saved Loops Mode
Each one of the 4 pad represents a slot to save and recall a loop.
Press a Pad to save (and trigger at the same time - if not already) a Loop at the current position.
Hold the same Pad down for more than 2 seconds to delete the saved loop from the slot.
When a Loop is saved to a slot, use the same Pad to load* (enable) the saved loop, but not jump to its position if the loop is saved to a later position than the current one (loop load and prepare).
Hold SHIFT and then use the same Pad to load* (enable) the saved loop, and jump to its position.
*Note that only 1 Loop can be enabled each time.
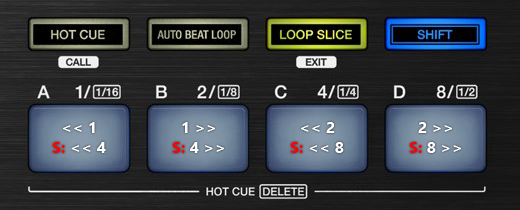
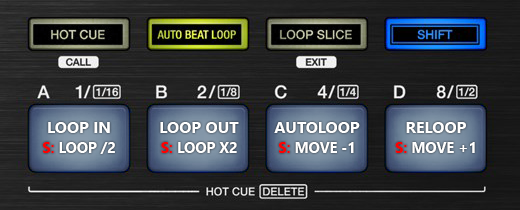
Manual Loop Mode
Use the 1st PAD to set a Loop In (Entry) point. Use the 2nd PAD to set the Exit point of the loop (Loop Out). Use the 3rd PAD to exit the Loop (if a loop is active) or to create an automatic Loop. Use the 4th PAD to activate the last triggered loop (Reloop)
Hold SHIFT and use the 1st and 2nd PADs to halve or double the size of the loop.
Hold SHIFT and use the 3rd and 4th PADs to move the triggered loop 1 beat backwards or forward.
Beat Jump Mode
In this mode, the 4 PADs will jump the track backwards/forward by the amount of beats depending on the selected Beatjump page (from 1/8 beats to 32 Bars)
Hold SHIFT and use the PADs to jump on different sizes of beats.