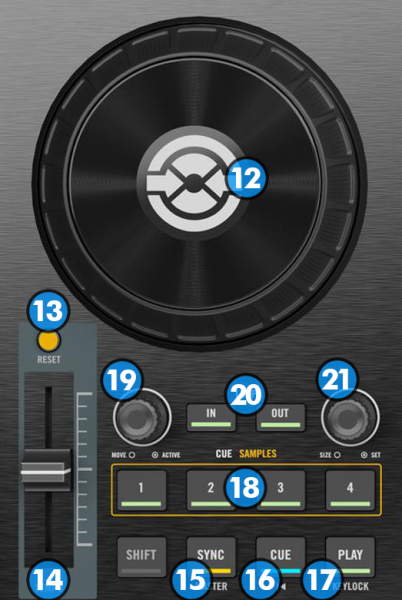
JOG: Pressure sensitive jogwheel. Use the jogwheel to scratch or bend (depending on the Vinyl/Scratch mode selection) or fast seek through the track if the Search mode is enabled. The Jogwheel also offers Loop In and Loop Out point adjustment (see Loop Controls)
SLIP: Enables Slip Mode. Several software functions (such as Jogwheel movements, HotCues and Loops) will apply temporarily on the track, and the track will return to the position it would have been if those functions were not triggered.
PITCH: Controls the track's playback tempo. Note: The actual pitch fader will not alter the pitch of the track if the actual pitch and the software pitch value do not match (software soft-takeover, ghost fader visible on the GUI). In most cases this may happen if SYNC is prior pressed or switching decks and the other deck is having a different pitch software value.
SYNC: Press this button to automatically match the corresponding Deck's tempo with the opposite Deck's (or the Master Deck’s if using a 4 decks Skin) tempo and phase. Hold down SHIFT and press this button to set this deck as Master Deck (for 4 decks skins)
CUE: When the Deck is paused, you can set a temporary Cue Point by moving the Platter to place the Audio Pointer at the desired location and then pressing the Cue Button. During playback, you can press the Cue Button to return the track to this Cue Point. (If you did not set a Cue Point, then it will return to the beginning of the track.). If the Deck is paused, you can press and hold the Cue Button to play the track from the Temporary Cue Point. Releasing the Cue Button will return the track to the temporary Cue Point and pause it. To continue playback without returning to the Temporary Cue Point, press and hold the Cue Button, then press and hold the Play Button, and then release both buttons. Hold down SHIFT and then press this button to return to the cue point.
PLAY/PAUSE: Plays / Pauses the track. Hold down SHIFT and then press this button to toggle “Key Lock” on/off. When “Key Lock” is engaged the track’s pitch will lock to the current key when you move the Pitch Slider (14) to alter the tempo of the song.
HOTCUE/SAMPLER: These buttons offer two different operation modes depending on the status of Sampler Toggle Buttons (10). On HotCue mode each one of the 4 buttons assigns a Hot Cue Point or jumps the track to that Hot Cue Point (if assigned). When a Hot Cue Button is unlit, you can assign a Hot Cue Point by pressing it at the desired point in your track. Once it is assigned, the Hot Cue Button will light on. Hold SHIFT and then press a button to delete its assigned Hot Cue Point. . On Sampler mode each one of buttons pads triggers a sample from the selected Sampler Bank of VirtualDJ. If a bank has less than 5 samples, both sides will control the same samples. If a bank has more than 5 samples, the left side will control samples 1 to 4 and the right side samples 5 to 8. Press the buttons to trigger a sample. Hold SHIFT and press a button if you want to stop playing the selected sample.
LOOP MOVE: Turn this knob clockwise (while in a loop) to move the loop forward in the track. The loop will move as many beats as the current loop. Turn the knob counter clockwise to move the loop backwards in time. The track playing position will jump in order to remain inside the loop at the same position. Press the knob down to activate/deactivate an automatic loop.
LOOP IN/OUT: Use these buttons to set a Loop In and a Loop Out point (for manual looping). If “Smart Loop” is enabled in VirtualDj GUI, the Loop Out point will be automatically adjusted so that it creates a perfect seamless loop. While in a loop press the Loop Out button again to exit the loop. While the deck is in a loop hold down SHIFT and press Loop In button in order to toggle the jogwheel between “Loop In Adjust” and “Jog” mode. When the jogwheel is in “Loop In Adjust” mode the led of Loop In button will blink. While in “Loop In Adjust” mode, you can use the JOGWHEEL (12) to fine tune the loop in point. Hold down SHIFT and press Loop In button again to return normal “Jog” mode. Hold down SHIFT and press the Loop Out button (while in a loop) in order to toggle the jogwheel between “Loop Out Adjust” and “Jog” mode. When the jogwheel is in “Loop Out Adjust” mode the led of Loop Out button will blink. While in “Loop Out Adjust” mode, you can use the JOGWHEEL (12) to fine tune the loop out point of your loop. Hold down SHIFT and press Loop Out button again to return normal “Jog” mode.
LOOP SIZE: Turn this knob to adjust the size used by automatic loops, or to change the length of the current loop. Press the knob down to activate a momentary Loop Roll effect.