


DDJ-SX3
Mixer Controls
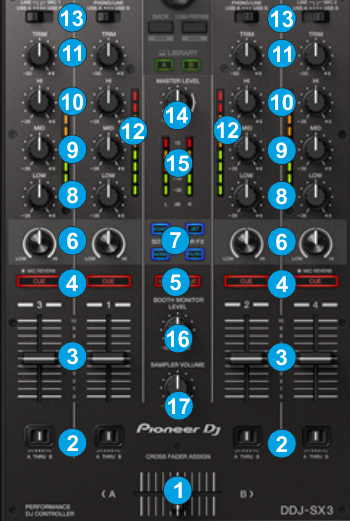
- CROSSFADER: Blends audio between the left and right assigned channels.
- CROSSFADER ASSIGN: Assign each deck on the left (A position) or right (B position) side of the crossfader, or alternatively bypass the crossfader entirely (THRU position)
- VOLUME: Alter the sound of each deck. While SHIFT is held down, the VOLUME faders will stop the deck at the previously selected Cue point when these reach the minimum level (zero - Fader Stop) and they will start the deck - synced to the other deck - if those are moved away from the zero position. (Fader Start)
- PFL: Press this button to send this channel's pre-fader signal to the Headphones Channel for monitoring. When engaged, the button will be lit. Press SHIFT and then one of the PFL buttons to manually tap the tempo of the loaded track.
- MASTER PFL: Press this button to send the Master Output to the Headphones channel (Hardware operation)
- COLOR FX KNOB: Adjust the selected Sound Color FX (middle position is Off position).
- COLOR FX: Select one the available Sound Color Effects (Echo, Jet, Noise and Filter).
The Echo, Jet and Noise Color FX are applied from the DDJ-SX3 (hardware effects) and cannot be changed/replaced.
The Filter Color FX is applied from VirtualDJ and can be replaced/changed from GUI or custom mapping. - * EQ-LOW: Adjust the Equalizer low (bass) frequencies of the corresponding deck.
- * EQ-MID: Adjust the Equalizer middle (mid) frequencies of the corresponding deck
- * EQ-HI: Adjust the Equalizer high (treble) frequencies of the corresponding deck
- TRIM: Adjusts the audio level (gain) of the corresponding deck. When the “GainSliderIncludesAutoGain” option inside VirtualDj’s configuration is set to yes (default) then the normal (park) position is 12 o clock.
- PFL VU METERS: Shows the strength of each channel’s pre fader signal.
- SOURCE SELECTORS Select the Source of each Mixer Channel. Set to USB A or USB B (depending on the USB port you have connected your computer to - rear panel) to control a VirtualDJ Deck and route its audio signal to the corresponding mixer channel.
Set to LINE/PHONO/MIC1/MIC2 to route the audio signal of the selected Input (connection at the rear panel) to the corresponding mixer channel. When set to one of these positions, the audio signal from VirtualDJ Deck will be muted) - MASTER VOLUME. Adjust the level of the Master Output. Hardware operation, not visible on the VirtualDJ GUI.
- MASTER VOLUME VU-METERS: Shows strength of the master output signal.
- BOOTH MONITOR LEVEL: Adjust the level of the Booth Output. Hardware operation, not visible on the VirtualDJ GUI.
- SAMPLER VOLUME: Adjusts the Master Volume of the Sampler
Note * The device is offering Stems control with the EQ knobs (Modern and EZRemix modes). For the Full Stems mode to work, the Filter must be selected as Color FX. See details at EQ Modes