


XDJ-RX2
Deck Controls
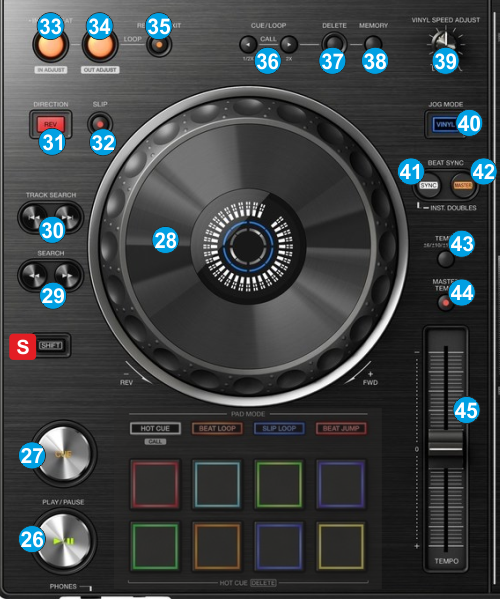
S SHIFT.Hold this button down to access additional functionality for several buttons/knobs as described in this manual.
- PLAY: Play/Pauses the track.
- CUE: When the Deck is paused, you can set a temporary Cue Point by moving the Platter to place the Audio Pointer at the desired location and then pressing the Cue Button. During playback, you can press the Cue Button to return the track to this Cue Point. (If you did not set a Cue Point, then it will return to the beginning of the track.). If the Deck is paused, you can press and hold the Cue Button to play the track from the Temporary Cue Point. Releasing the Cue Button will return the track to the temporary Cue Point and pause it. To continue playback without returning to the Temporary Cue Point, press and hold the Cue Button, then press and hold the Play Button, and then release both buttons.
- JOG: Touch sensitive platter for scratching or bending. When in Vinyl mode, use the upper part of the jogwheel to scratch and the outer part to bend. When in Bend mode (Vinyl mode is disabled), use any part of the jogwheel to bend.
Hold SHIFT and use the JOG in Seek (Search) mode. - SEARCH: Use these buttons to move track backwards/forward by 4 beats. Keep the buttons pushed for continuous seeking
- TRACK SEARCH: Depending on the operation selection (available in the XDJ-Settings Pad page), these buttons can be used in 2 ways, either backwards/forward seek by 16 beats, or load and play previous/next track from the Browser
- DIRECTION: Press and hold this button to play the track in reverse. Track will resume forward playback when button is released. If Slip mode is enabled, and the button is released, track will resume forward playback from the position it would have been if the Reverse button was never pressed.
- SLIP: Use this button to enable/disable Slip mode. When Slip mode is enabled, several functions such as Hotcues, Loops, Scratching etc, will act temporary (track will resume playback from the position it would have been if this function was never executed)
- LOOP IN: Use this button to set current track's position as the beginning of a manual loop. When in Loop, use this button to set jogwheel to Loop-In Adjust mode and then use the jogwheel to fine-adjust the start point of the loop. (led will blink fast)
Hold this button down for more than 2 seconds to enable a 4 beats Auto Loop - LOOP OUT: Use this button to set current track's position as the end point of a manual loop. When in Loop, use this button to set jogwheel to Loop-Out Adjust mode and then use the jogwheel to fine-adjust the end point of the loop.(led will blink fast)
- RELOOP: When track is in Loop, use this button to exit the Loop. When not in Loop, use this button to enable the last triggered Loop (and jump to its start point).
- LOOP HALF/DOUBLE: Use these buttons to half/double the size of the Loop (in beats)
- DELETE: Use this button to delete the Saved Loop of the track (1st-default slot)
- MEMORY: Use this button to save (and enable) a Loop at the current position to the 1st (default) Saved Loop slot. When a track has a Saved Loop at the default slot, use this button to enable the Loop at its saved position. Track will jump to this position if current position is later to the Saved Loop, and will not jump if earlier.
- VINYL SPEED ADJUST: Use this knob to adjust both the time that the track will need to reach its nominal speed, when track is paused or started. For instant start/stop, set the knob to its minimum position (left)
- VINYL: Use this button to toggle between the CD (Bend) and Vinyl (Scratch) modes for the Jogwheel
- SYNC: Use this button to match Tempo and Beat-Phase of the deck with the values of the opposite deck (or Master Deck if more than 2 decks are used). The Master Deck selection is made automatically by VirtualDJ, mostly depending on the Deck that is playing out in Master.
- MASTER: Use this button to manually set a deck as Master Deck and force all other decks to sync to the Master Deck when SYNC is used. The Master Deck selection is made automatically by VirtualDJ, mostly depending on the Deck that is playing out in Master. To return to the automatic selection, press again the button on the deck that is currently lit.
- TEMPO RANGE: Use this button to select the next % range for the Pitch fader. In order the ranges to match with ones available on the Display, the pitch ranges cycle though the values 6%, 10%, 16% and 100% (WIDE) . Other values can be selected from the GUI of VirtualDJ.
- KEYLOCK : Use this button to enable/disable Key-Lock (Master Tempo). When enabled, the Key of the track will retain its value when the Tempo of the track is changed.
- PITCH : Pitch fader to adjust the Tempo of the track.