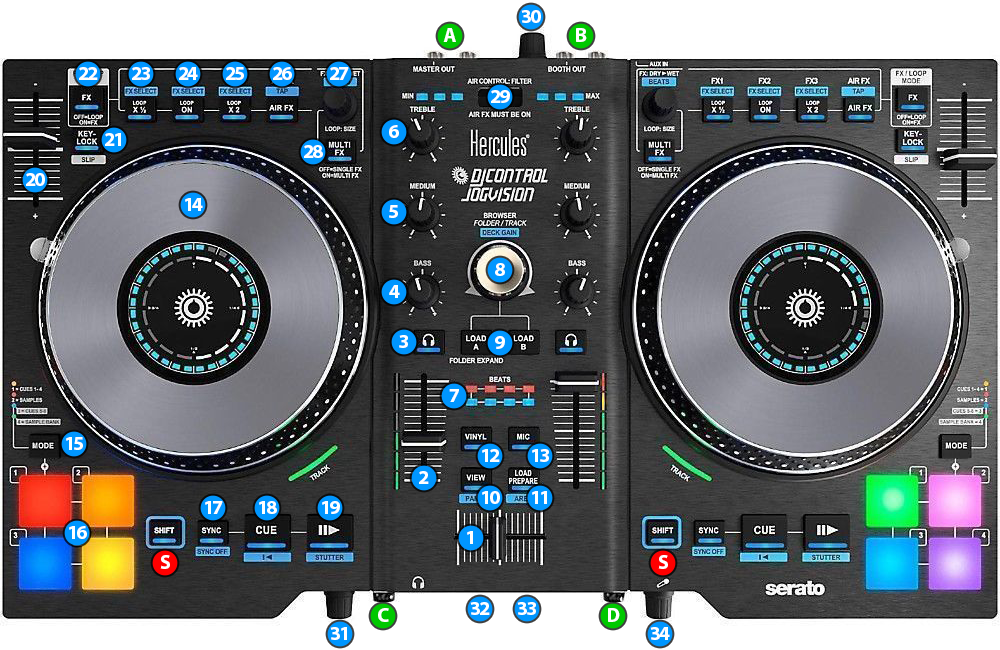
A MASTER OUTPUTConnect a pair of amplified speakers using standard RCA cablesB BOOTH OUTPUTConnect a separate pair of amplified speakers using standard RCA cablesC HEADPHONES SOCKETConnect your Headphones using a 1/4 " cable or adapterD MIC SOCKETConnect your Mic using a 1/4 " cable or adapterS SHIFTPress this button down to access secondary actions as described in the SHIFT ACTION column
KEY
ACTION
SHIFT (SECONDARY) ACTION
1 CROSSFADERWhen on far left position, only sound from the left deck will be heard from the Master Output. When at far right position, only the sound of the right deck will be heard from the Master Output. In all other positions, the audio signals from left/right decks will be blend.2 VOLUMEAdjust the Volume of the Left/Right deck.3 PFLUse these buttons to send the pre-fader audio signal of the Left/Right deck to the Headphones channel for pre-listening (connection at the front side).4 BASSUse these knobs to cut/boost the frequencies of the Low/Bass Equalizer Band. No adjustment is made when the knob is at the middle/center position.5 MEDIUMUse these knobs to cut/boost the frequencies of the Middle/Medium Equalizer Band. No adjustment is made when the knob is at the middle/center position.6 TREBLEUse these knobs to cut/boost the frequencies of the High/Tremble Equalizer Band. No adjustment is made when the knob is at the middle/center position.7 BEATSThese leds provide a visual aid for mixing. A perfect mix is possible when both Red & Blue leds on the same column change together.8 BROWSERUse this dial to scroll through the folders or tracks, depending on the focused Browser List. Push the dial, to toggle focus between the Folders and Songs Lists. When focus is on the Folders List, push LOAD button to open/close sub-folders.Adjusts the pre-fader output level of the Left/Right deck, depnding on which side SHIFT button is pressed.9 LOADUse these buttons to load the selected track from the Browser to the Left/Right deck. When Browser focus is on the Folders List, push these buttons to open/close sub-folders.10 VIEWShows/Hides the Sideview List.Changes the central panel of the default VirtualDJ skin.11 LOAD PREPARELoads the selected track on the Playlist Sideview Tab.Changes the selected Sideview Tab.12 VINYLEnable/disable Vinyl mode for all decks. When enabled, use the upper/top surface of the jogwheel to scratch and the outer to bend. When disabled, the entire surface (upper and outer) of the jogwheel will be used for bending.13 MICToggles MIC input on/off (hardware operation).14 JOGWHEELTouch-sensitive jogwheel for scratching or bending (temporary speed up/down tempo) the track, depending on the Vinyl mode.15 PAD MODEKeep this button pressed and then press one of the PAD BUTTONS to select a mode for the PAD BUTTONS. See more details at Pads section of this manual.16 PAD BUTTONSThese buttons offer different functionality depending on the selected Pads mode. See more details at Pads section of this manual.These buttons offer different functionality depending on the selected Pads mode. See more details at Pads section of this manual.17 SYNCMatch BPM and Beat Phase with the opposite deckSmooth pitch reset. When pressed track will gradually get its original tempo.18 CUESets current position as Temporary Cue point. Preview track when paused while button is pressed Jumps and stops to the Cue point when playingReturns to the beginning of the track19 PLAYPlay/Pause the track loaded to left/right deckPlay-stutter track. When pressed, track will resume playing from the previously stopped position20 PITCHAdjust the playback speed of the loaded track. When in middle position the track plays at its original speed.21 KEY LOCKLocks the current key of the track so that changing playback speed with PITCH won't alter it.Enable/disable Slip mode. When Slip mode is enabled several functions, such as scratching, loops and hotcues will be performed temporary and when finished (released), the track will resume from the position it would have been if the action was never triggered. 22 FX/LOOP MODEToggles whether controls 23,24,25 & 27 will work to control loops or effects. When the button's LED is off, Loop mode is active. When the button's LED is on, Effect mode is active.23 FX1/LOOP X1/2Loop mode: Halves the size of the current loop (or the automatic beat loop if no loop is active). Single Effect mode: Turns on/off the default effect. Multi Effects mode: Turns on/off the effect in first slot.Single Effect mode: Selects the next effect of the effects list as the default effect. Multi Effects mode: Selects the next effect of the effects list in the first slot.24 FX2/LOOP ONLoop mode: Toggles an automatic beat loop on/off Single Effect mode: Turns on/off the first switch of the default effect (if supported). Multi Effects mode: Turns on/off the effect in second slot.Single Effect mode: Turns on/off the third switch of the default effect (if supported). Multi Effects mode: Selects the next effect of the effects list in the second slot.25 FX3/LOOP X2Loop mode: Doubles the size of the current loop (or the automatic beat loop if no loop is active). Single Effect mode: Turns on/off the second switch of default effect (if supported). Multi Effects mode: Turns on/off the effect in third slot.Single Effect mode: Turns on/off the fourth switch of the default effect (if supported). Multi Effects mode: Selects the next effect of the effects list in the third slot.26 AIR FXEnables the Air FX control for the left/right deck. When Air FX is enabled use the Air Control sensor (29) to apply a filter effect deck's output.Tap the button a few times to set a new BPM for the track in case the automatic detection was not correct.27 FX DRY-WET/LOOP SIZELoop mode: Turn the knob to halve or double the size of the current loop (or the automatic beat loop if no loop is active). Turn counter clockwise to halve the size of the loop, and clockwise to double it. Single Effect mode: Adjusts the first parameter of the default effect (if supported). Multi Effects mode: Adjusts the first parameter of all effects loaded in the 3 effect slots (if supported).Single Effect mode: Adjusts the second parameter of the default effect (if supported). Multi Effects mode: Adjusts the second parameter of all effects loaded in the 3 effect slots (if supported).28 MULTI FXToggles whether effect controls 23,24,25 & 27 will work to control a single effect and give access to more parameters of the effect, or to three different effects at once. When the button's LED is on, Multiple Effects mode is active. When the button's LED is off, Single Effect mode is active.29 AIR CONTROLWhen Air FX is active on any deck use this sensor to apply a low pass filter on deck's output. The closer your hand is above the sensor, the more the filter sound will apply. 30 BOOTH VOLUMEUse this slider to adjust the volume of the booth output.31 HEADPHONES VOLUMEUse this slider to adjust the volume of your headphones.32 PHONES MIX CUEPress this button to send your channels cue-ing sound on your headphones.33 PHONES MIX MASTERPress this button to send the sound of the master output on your headphones.34 MIC VOLUMEUse this slider to adjust the volume of your mic.