XDJ-RX2
Microphone Inputs

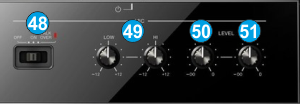
- MIC ON/OFF: Set this switcher to OFF position to prevent audio signal from the Microphone Inputs (connections at the rear panel) from output.Set the switcher to ON position to allow audio signal from the Microphone Inputs and route to the Master Output. Set the switcher to the TALK OVER position to automatically lower the Master Output level when signal is detected from the Microphone Inputs.
- MIC EQ: Use these knobs to adjust the Low and High frequencies on both the Microphone Inputs signals
- MIC 1 LEVEL: Use this knob to adjust the level of the Microphone 1 Input (connection at the rear panel)
- MIC 2 LEVEL: Use this knob to adjust the level of the Microphone 2 Input (connection at the rear panel)
Note that the Microphone Inputs are not part of the USB Audio Interface, thus they cant be included to the Audio Setup of VirtualDJ, and the MIC Controls of the VirtualDJ GUI will not control these inputs (or vice versa).
Microphone Inputs can be recorded along with your mix, only when recording to the USB 2 Source via the MASTER REC button.
USB SOURCES

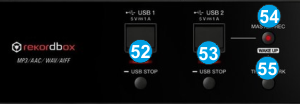
- USB 1: Use this socket to connect a USB Flash Drive. When connected, use the USB 1 button at the left side of the Display to Browse through its content. This source is not used within VirtualDJ.
Press the STOP button below this socket, to stop reading its content and eject the Media - USB 2: Use this socket to connect an additional USB Flash Drive. When connected, use the USB 2 button at the left side of the Display to Browse through its content. This source is not used within VirtualDJ.
Press the STOP button below this socket, to stop reading its content and eject the Media.
This USB connection can be used to record your mix, including any External Source and Microphones - MASTER REC: Press this button to start/stop recording your mix in the USB 2 Source. The recorded tracks are stored in a PIONEER DJ REC folder in WAV format
- TRACK MARK: Use this button to split the recording and continue as additional track.


